Guide
Faktwise Quick Start: From Install to Your First E-Invoice
Updated 2026-09-30
Faktwise turns eligible paid Shopify orders into e-invoices according to your saved automation and source choices. Start by installing the app, saving your company details and reviewing which sources should receive automatic invoices. Then check your first eligible order and its PDF/XML downloads. You do not need an accounting background, just access to your Shopify admin.
Step 1: Install Faktwise from the Shopify App Store
Open Faktwise on the Shopify App Store and install the app. Shopify asks for the required permissions. You will then find Faktwise in your Shopify admin. Free includes 5 invoices per month. Unlimited is billed at USD 22 every 30 days, approximately EUR 19 depending on the exchange rate, with a 14-day trial.
Step 2: Enter your company details in Settings
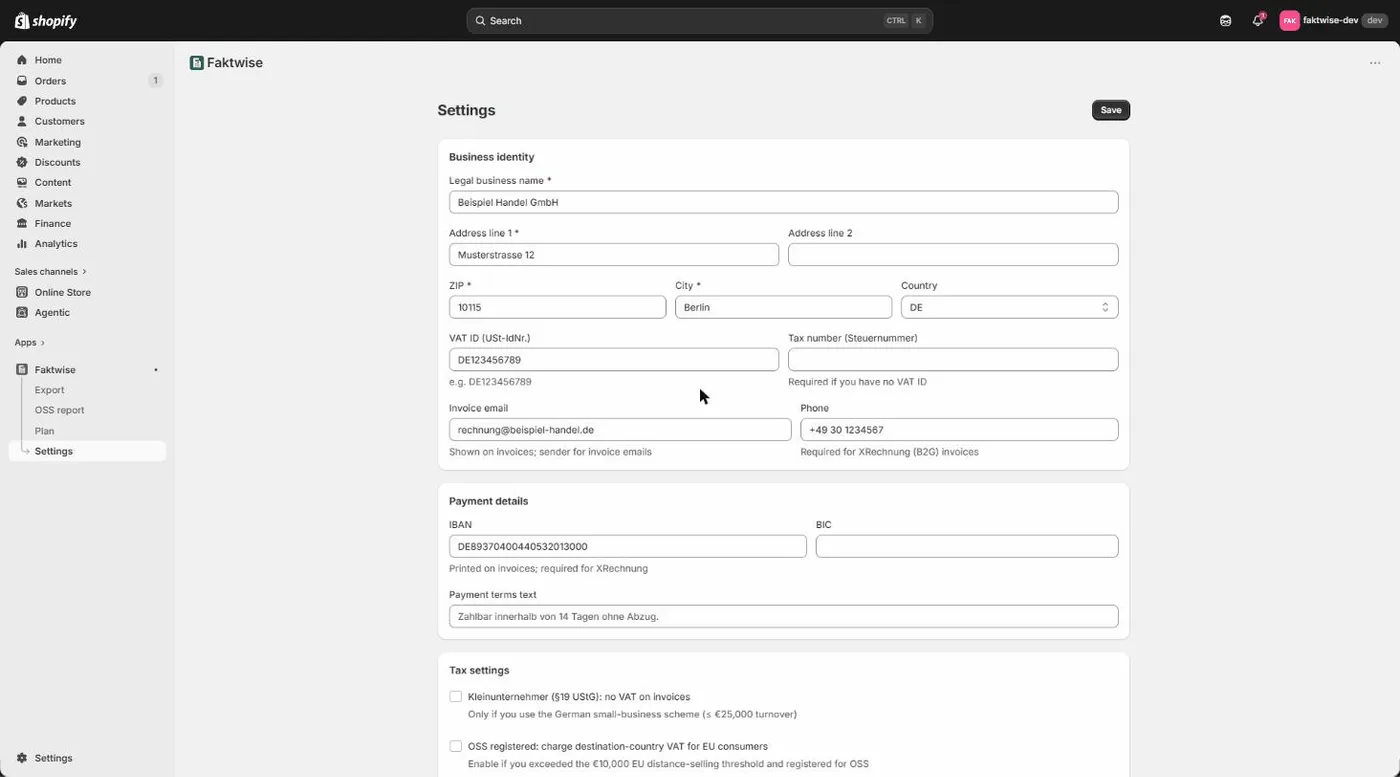
Open Settings inside the app. This is where you enter the details that have to appear on every invoice. The reason is § 14 UStG, the section of the German VAT Act that lists the mandatory contents of an invoice. If one of them is missing, the invoice is formally incomplete.
The required fields:
- Legal name: the official name of your business, because § 14 requires the full name of the supplier.
- Address, ZIP, city and country: your complete business address, also mandatory.
- USt-IdNr. or Steuernummer: one of the two is enough. The USt-IdNr. is your EU-wide VAT ID, the Steuernummer is the number your German tax office assigned to you.
Optional, but worth filling in right away:
- Contact email and IBAN (plus BIC): these unlock XRechnung for public-sector orders. The XRechnung standard requires the seller’s contact and payment details; if they are missing, an order with a Leitweg-ID is issued as a ZUGFeRD invoice instead, and the dashboard shows a notice.
- A phone number and a payment terms text.
You will also see a few switches: Kleinunternehmer for merchants under § 19 UStG (the German small business scheme; such invoices show no VAT at all), OSS for the EU One Stop Shop scheme (it lets you report VAT on B2C sales to other EU countries centrally; switch it on only if you actually take part in OSS), a default for whether you mainly sell goods or services, the invoice language (German or English), and the automatic invoice email. Automatic invoicing on paid orders is switched on by default. The invoice settings guide explains every field and switch in detail.
Important: nothing is generated until you save
Until your company setup is saved, Faktwise cannot issue invoices. Source-selected shops see orders that need attention in Orders needing review. Saving settings does not automatically issue already-held orders.
Review which sources are automatic
In Settings, open Review automatic sources. New shops start with the initial own-store source rule; unrecognized sources, including unidentified imports, wait for review. You can enable multiple observed groups. Existing merchants keep their current behavior unless they explicitly switch to source selection. If a marketplace already invoices its orders, leave its group unselected. See the source setup and timing choices before changing an existing shop’s rules.
Step 3: Add the cart field for VAT IDs and Leitweg-IDs
If you sell to business or public-sector customers, this extra step is worth it. The Faktwise cart field is a theme app block you set up once: go to Online Store > Themes > Customize (the Settings page in Faktwise has a card that deep-links you straight into the theme editor), switch to the cart template, add the Faktwise VAT / Leitweg-ID section from the Apps group, and save. In your storefront the field stays collapsed behind a business customer toggle; the buyer expands it and enters a VAT ID and/or a Leitweg-ID. A Leitweg-ID is the routing code German public authorities use to direct e-invoices to the right recipient; eligible orders with one can receive XRechnung when seller contact email and IBAN are set; otherwise Faktwise shows a ZUGFeRD fallback notice. An EU VAT ID is checked against VIES or a shop-specific cached result up to 30 days old, the EU’s VAT number verification system, at invoice time; without a valid current or cached result, the VAT ID does not establish EU B2B exemption. The block works on every Shopify plan because it lives on the cart page, not in checkout, where custom fields are a Shopify Plus feature. The cart field guide walks through this step by step.
Step 4: Place a test order and pay it
Use an eligible paid order from an enabled source. If you choose to place a test order, use your store’s test-payment setup, not a real payment just to try the app. Faktwise reacts to Shopify reporting payment, subject to your rules and invoice checks. If the order waits in Orders needing review, read the reason; you can request an eligible invoice individually, with customer email off by default, or dismiss it. A queued request is not yet an issued invoice.
Step 5: Look at your first invoice on the dashboard
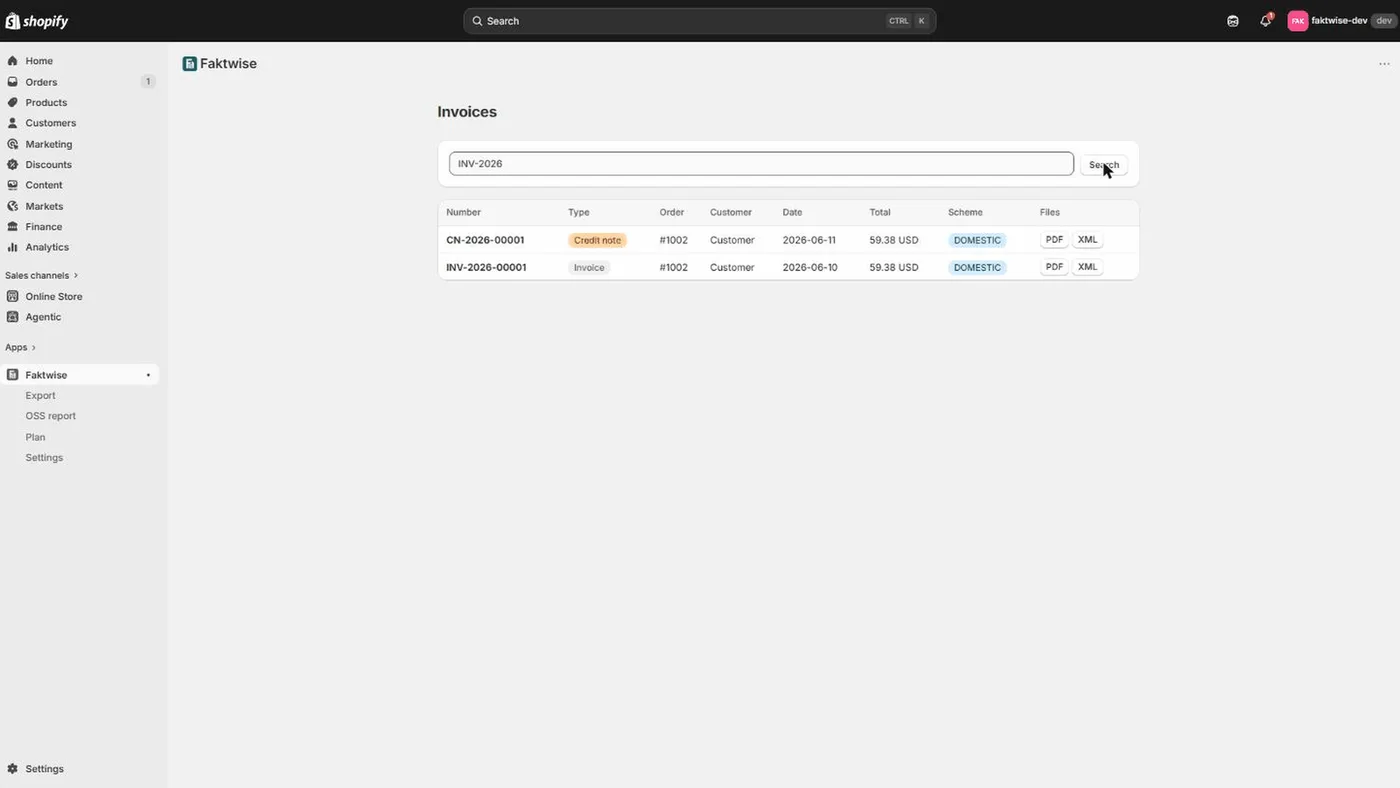
Open the Faktwise dashboard and check that the invoice is issued and its files are ready. Download the PDF and XML. For ZUGFeRD, the PDF/A-3 contains embedded invoice XML; for XRechnung, the XML is the structured invoice and the PDF is its readable companion. Check company details, amounts and VAT treatment. You can separately check files in our free invoice validator, which uses KoSIT for XRechnung and Mustang for ZUGFeRD, including PDF/A checks. That separate tool is not an automatic official-validator gate on every production invoice.
What happens on eligible future paid orders
From now on, invoicing runs in the background while you sell:
- Automatic invoice: eligible orders permitted by your rules receive a PDF with embedded ZUGFeRD XML, or XRechnung XML plus a readable PDF when the Leitweg-ID and seller details permit it. Unknown or unselected sources wait for review in source-selected shops.
- The right VAT scheme: Faktwise applies one of six schemes automatically: German domestic sales at 19 percent (with the reduced 7 percent rate per line when the Shopify order data marks a line as reduced), reverse charge for EU cross-border B2B services (the VAT liability shifts to the buyer; purely domestic German § 13b cases are not covered), intra-community supplies for EU cross-border B2B goods, OSS for B2C sales to other EU countries at the destination country’s standard rate (only once you have switched OSS on), tax-free exports outside the EU, and the Kleinunternehmer scheme with no VAT shown. The correct legal wording is printed on the invoice automatically.
- Gap-free numbering: invoice numbers run sequentially per year, for example INV-2026-00042, and a failed generation never burns a number.
- Corrections via credit note: issued invoices are not edited afterwards. Supported refunds create a credit note referencing the original invoice. Refunds whose amounts cannot be safely matched need attention rather than an invented correction. See the refund limitations.
- Archive: every invoice (PDF and XML) is stored for ten years, beyond the statutory eight-year retention period that applies since 2025. The archive is designed for the GoBD requirements, the German tax authority’s rules for keeping digital records: invoices are stored so they are not changed after issue, corrections happen only through credit notes, and personal data is encrypted at rest. The GoBD archiving guide has the details.
- Optional email: Faktwise can send an eligible invoice PDF after the document and files are ready, if your saved email choice permits it and a buyer email is available. Automatic customer email is off by default; a held-order request has its own email choice, also off by default. Uncertain delivery is not blindly resent.
That is the quick start: install, save your company details, review your automatic sources, optionally add the cart field, and check your first eligible invoice. The current shop-level VAT settings do not provide product-specific mixed-event tax logic or change Shopify checkout tax. Faktwise is software, not tax advice. If you would like to see the existing invoice and export flow before installing, have a look at the demo.